Wednesday, July 31, 2024

VisualVM on Windows with SDKMAN

 7/31/2024 - I have been using SDKMAN on Windows via Git Bash for some time now and truly like it.  I did however come across an interesting bug/solution when installing VisualVM however. 

Symptom:  When starting VisualVM from command line (i.e. > visualvm), there would be some delay as if the script/program were starting but then I would just get the prompt back after a few seconds and the app would never appear.  

Research:  I assumed the app was starting but failing.  After a small amount of web searching, I found the log file in ~/.visualvm/2.1.8/var/log/messages.log.  Though it gave the following somewhat specific message (below), the root cause seemed elusive. Eventually, I downloaded the latest (2.1.9) VisualVM .zip file manually from the actual web site and followed the installation instructions which are simply to unzip the file and then run 'visualvm.exe'.  This worked but should be noted that it DID start with an "Accept License" dialog that is noted in their troubleshooting guide AND implied by the error message.

WARNING [org.netbeans.core.startup.Main]
java.lang.NoClassDefFoundError: org.graalvm.visualvm.modules.startup.AcceptLicense starting fr
om org.netbeans.MainImpl$BootClassLoader@404b9385 with possible defining loaders null and decl
ared parents ]

Solution: It may be somewhat unconventional and maybe not "guaranteed" in all situations but I eventually just tried copying the 'visualvm.exe' from 2.1.9 into the /bin of version 2.1.8 (installed by sdkman).  This seemed to work and I could now start from git bash via > visualvm.exe

However... for simplicity sake, I don't like having to remember to add the '.exe' at the git bash command line.  So, what I did was rename the original script ( 'visualvm' ) to something like 'visualvm_original'.  Then, I created a new script as shown below.  This worked.

new script: visualvm

#!/bin/sh
visualvm.exe &


Tuesday, July 31, 2018

Maven Plugins and Eclipse

I have long meant to add this blog entry... Java newcomers are often confused by two different plugins that share VERY similar names... I can't even remember which is which based on their names alone:
Originally, the question was "which of these plugins should I use? or both?"  The answer has always been that the Maven Eclipse plugin should be solely sufficient if you are using Eclipse as your IDE with Maven projects.  This plugin duplicated the only feature provided by "the other" plugin, thereby rendering it pretty pointless.  (But, to be fair, "the other" plugin came first and filled a need at the time)

maven-eclipse-plugin

Note:  As of 7/31/208 (maybe as far back as 5/28/2015), this plugin is RETIRED and no longer maintained.

As its website states:
The Maven Eclipse Plugin is used to generate Eclipse IDE files (*.classpath, *.project, *.wtpmodules and the .settings folder) for use with a project.
In other words, if you have a Maven-ized project that you are not yet using with Eclipse, you can use this maven plugin to "pre-generate" Eclipse IDE files so that you can open/use the project in Eclipse.  This is a "one-time" conversion; once the files are generated with the plugin, you should not need to do so again.

Maven Eclipse plugin

This is an actual plugin for Eclipse.  It serves two purposes:
  • Allows you to open Maven projects in Eclipse (and in the process, it does the same thing that maven-eclipse-plugin does - namely, does a one-time create of Eclipse IDE project files)
  • Understands your local Maven installation and provides various features for configuring your local Maven installation. Also, and more importantly, this plugin allows you to run Maven(mvn) commands via your IDE's GUI.  Some of the most common commands are 'mvn clean' and 'mvn install'.
See this dated article for some history regarding m2eclipse.

Wednesday, April 16, 2014

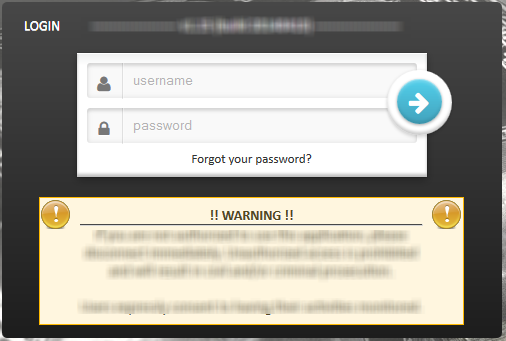
Login Form

Thanks to this site I have discovered some new CSS and the great Font Awesome library.

This form looks good on a dark gradient background with white text.

#yourdiv {
    background: linear-gradient(#474747, #1D1D1D);
    border-radius: 5px;

    font-size: 13px;
    font-family: 'Lato', Calibri, Arial, sans-serif;
    text-shadow: 0 1px 0 rgba(255,255,255,0.8);
} 

It is common to have errors and warnings displayed.
Red errors and yellow warnings look good like this:

#insideyourdiv.error {
    color: #C00000;
    background: url("error.png"), url("error.png") scroll 0.5em 50% #FFF6DF;
    background-repeat: no-repeat, no-repeat;
    background-position: left top, right top;
    border: 1px solid #C00000;
}

#insideyourdiv.warning {
    color: #514721;
    background: url("warning.png"), url("warning.png") scroll 0.5em 50% #FFF6DF;
    background-repeat: no-repeat, no-repeat;
    background-position: left top, right top;
    border: 1px solid #FFB900;
} 


Friday, April 11, 2014

ExtJS Rant

First, let me say that I have very few negative comments regarding ExtJS/Sencha. I use it and consider it the premier* client-side javascript framework for web applications.

* I know there are many alternatives out there and am not trying to incite a holy war. This is simply my opinion: swayed by many things, not the least of which is the fact that Java is my "native" language. 

However, I finally came across something that just simply irked me. Simply, there is an AJAX/JSON Reader property on the proxy object named 'messageProperty'. One would think that this could be used somewhere/somehow. As near as I can tell, it is virtually useless.

Here is some pretty boilerplate sample code from the common use case of programmatically synchronizing the Store in response to a Button click:

someStore = Ext.create('Ext.data.Store', {
    model: 'someModel'
    ,autoLoad: true // set to true for production
    ,autoSync: false // set to false since we are submitting the form via AJAX, in lieu of using store syncing
    ,sorters: [ { root: 'data' ,property: 'id' ,direction: 'DESC' } ] // ASC | DESC
    ,proxy: {
        type: 'ajax'
        ,listeners: { exception: aCommonExceptionListener }
        ,reader: { type: 'json', root: 'data', successProperty: 'success', messageProperty: 'message' }
        ,writer: { type: 'json', root: 'data', encode: true, allowSingle: false }
        ,api: { 
            read: 'aRestUrl/view' 
            ,update: 'aRestUrl/update' 
        }
    }
});

namespace.doSaveChanges = function() {

    var options = {
        callback: function() { }
        ,success: function() {
            a.LoadMask.hide();            
            Ext.Msg.show( { title: 'Success'
                ,msg: 'Changes were Saved'
                ,buttons: Ext.Msg.OK
                ,icon: Ext.Msg.INFO
            } );
            Ext.Msg.setY(25);                
        }
        ,failure: function(batch, options) { 
            a.LoadMask.hide();            
            Ext.Msg.show( { title: 'Error'
                ,msg: batch.proxy.reader.rawData.message
                ,buttons: Ext.Msg.OK
                ,icon: Ext.Msg.ERROR
            } );
            Ext.Msg.setY(25);
        }
    };
    yourStore.sync(options);
}; 

So... notice the message property defined in the Store's Proxy.  Based on the similar property 'successProperty', I think it is safe to assume that the Proxy will make the JSON object with this name available to your code via a getter [like getMessage() !!!].  Nope,... you will notice that I have to navigate the batch.proxy.reader.rawData.message property manually.  AND... there is no abstraction of 'message' at all at this point... You are forced to use the exact message property that you send!

If I am missing something, please educate me.  Please.  But until then... total fail on this on fellas.

p.s. This is totally unrelated to this rant but I wanted to capture it.  I am using Spring WebMVC and, though this is documented by sencha, it is not exactly obvious.  It is important that you configure your JSON writer with this...

root: 'data', encode: true

to ensure that Spring will put the JSON into the 'data' parameter on the request.

@RequestMapping(value="aRestUrl/update", method=RequestMethod.POST)
public void update(HttpServletRequest request, HttpServletResponse response) throws IOException {

    final UserRequestContext ctx = this.createRequestContext(request, null);
    final String data = request.getParameter("data");        
    
    final ServiceResponse sr = this.getService().updateSpecialQuestions(ctx, data);
    final ExtJSAJAX model = new ExtJSAJAX(sr);       
    
    this.getJSON(response, model);
}    

Wednesday, April 9, 2014

ExtJS Button - Confirm when using HREF

ExtJS4 buttons (Ext.button.Button) have the properties 'href' and 'hrefTarget' to allow a button to act more naturally like a hyperlink.  However, I had the need to display a confirmation dialog (under certain conditions) before navigating away from the page.  This code feels a bit hacky but it works. The most pertinent thing to mention is that the 'allowDefault' property is not an ExtJS property so by using it, it _might_ be subject to a conflict in later versions of ExtJS.  Constructive feedback and questions are welcome.

This is the relevant stack:
ExtJS 4.2

Simply install this function as the click listener (not to be confused with the 'handler' property, which may work but is untested by me):
var button = Ext.create('Ext.button.Button', {   
    text: 'Back to ...'
    ,iconCls: 'clsActionBack'
    ,disabled: false
    ,href: 'href-goes-here'
    ,hrefTarget: '_self'
    ,listeners: { click: the_following_function }
    ,handler: function() { }
    ,scope: this
});


var the_following_function = function(btn, e, eOpts) {        
    if (btn.allowDefault) {
        // nothing special to do; will fall thru to return true
    } else {
        var isdirty = some_boolean_logic_or_function_here();
        if (isdirty) {
            e.preventDefault();

            Ext.Msg.confirm( 'Confirm'
                ,'Do you want to leave this page without saving your changes?'
                ,function(id, value) { 
                    if (id === 'yes') {                        
                        btn.allowDefault = true;
                        btn.btnEl.dom.click();
                    }
                }
            );
            Ext.Msg.setY(25); // (optional) reposition the msgbox

            return false;                 
        }
    }
    
    return true;
};

Thursday, June 27, 2013

Dual Boot (Windows Vista + Linux Mint 15)

So... I know Windows Vista is a less than desirable Windows OS but... its the latest one I have paid for and... my old dilapidated PC had a motherboard go bad. So, long story short, I built a new computer without any pre-installed OS and wanted to do a dual boot system since I have been recently reintroduced into the Linux world and absolutely love the Linux Mint distro.

Here's my "stack":

  • Hardware: 
    • ASRock Z87 Extreme4 motherboard 
    • Intel i5 Processor
    • 120GB SSD (Samsung) 
    • 8GB RAM (no video card initially)* 
  • OS: 
    • Windows Vista - 32bit 
    • Linux Mint 15 (Olivia) - 32bit** 
  • SSD Partitions:*** 
    • (1) 60GB NTFS 
    • (2) 30GB extended 
    • (2a) 8GB swap 
    • (2b) 10GB ext3 (mounted as /) 
    • (2c) 12GB ext4 (mounted as /opt) 
    • (2d) 4GB fat32 (just because) 
    • (3) 15GB NTFS (used to "share" between linux and windows) 
    • (4) 15GB xfs (mounted as /home)
* I will update this post when I install the video cards
** I did try to install the 64bit edition but ran into problems that I didn't have the time nor knowledge to solve.
*** Probably the most important info is that it is all on the same drive and I used extended/logical partitions. The sizes of the partions and the filesystems chosen were experimental.

Step 1 - Install Windows Vista into partition 1 

This went flawlessly using the install DVD. Other than having to sit through the three to four years of updates and reboots, it went fine. (FWIW, this used about half of my 60GB partition! I didn't expect it to be quite that large and just reaffirms my growing grumpiness with MS.)

Step 2 - Install Linux Mint 15 from LiveCD 

This also went flawlessly.

Step 3 - oops! Intermittent problems booting Vista from Grub 

Vista would always boot but 50% of the time it had one or more of the following bad symptoms: (1) Video was distorted (2) USB Keyboard would not work (3) USB Mouse would not work

Step 4 - the fix 

I won't go into all the google research and options I tried but here is what finally seems to work very well!
  1. Repair Vista MBR
    Used Vista install DVD to repair the MBR (see http://arstechnica.com/civis/viewtopic.php?f=16&t=158228); do not reinstall/enable grub at this point 
  2. Reboot
    Now, Vista boots great (but grub is gone so you can't yet boot into your previously working Mint installation) 
  3. Use EasyBCD
    Under Vista, use EasyBCD (just google it and install) to "Add a new entry". Choose: 
    1. Linux (and whatever your Mint root partition is) 
    2. Grub2 
  4. Reboot
    Your system now uses Windows Boot Manager natively then lets you use grub. This is backward from most install instructions you'll find for dual/multi boot systems but I don't care as long as it works :) 
Feel free to post comments though I am personally most interested if you have solutions that make GRUB work or know of why I might be having problems with the 64bit edition of Mint.

Wednesday, May 29, 2013

SSL + PostgreSQL + Apache BasicDataSource ( + Spring )

So... this may not be completely advisable for a production environment, but if you are using this stack, here is a snippet to show you how to get SSL connections working with PostgreSQL. It can surely be extrapolated for use in a production environment. The "connectionProperties" is the important piece though the other common properties are included for reference:
Stack:
  • PostgreSQL 
    • postgresql-9.0-801.jdbc4.jar 
  • Apache Commons 
    • commons-dbcp-1.4.jar 
  • Spring 
    • spring-xxx-3.0.5.RELEASE.jar 

<b:bean class="org.apache.commons.dbcp.BasicDataSource" destroy-method="close" id="yourid">
    <b:property name="url" value="${yourprop.url}"/>
    <b:property name="username" value="${yourprop.username}"/>
    <b:property name="password" value="${yourprop.password}"/>
    <b:property name="driverClassName" value="${yourprop.driverClassName}"/>
    <b:property name="connectionProperties" value="ssl=true;sslfactory=org.postgresql.ssl.NonValidatingFactory;">

Tuesday, April 23, 2013

Spring (3.0.5) + Transactions + postgreSQL/GreenPlum

The long and the short of it is that I am getting an exception when using declarative transactions with Spring + postgreSQL (GreenPlum variant): org.postgresql.util.PSQLException: Cannot change transaction read-only property in the middle of a transaction.

My stack is:
Java 1.7.0_17
Tomcat 7.0
Spring 3.0.5*
Apache DBCP 1.4
postgresql-9.0-801.jdbc4.jar
GreenPlum 4.2.2.4 (Commercial postgreSQL variant)
* I get this issue whether using declarative OR programmatic tx mgmt

My error is:
DEBUG o.s.j.d.DataSourceTransactionManager - Initiating transaction rollback
DEBUG o.s.j.d.DataSourceTransactionManager - Rolling back JDBC transaction on Connection [jdbc:postgresql://10.110.62.245/data, UserName=app_reports, PostgreSQL Native Driver]
DEBUG org.mybatis.spring.SqlSessionUtils - Transaction synchronization ended with unknown status for SqlSession [org.apache.ibatis.session.defaults.DefaultSqlSession@2db1692e]
DEBUG org.mybatis.spring.SqlSessionUtils - Transaction synchronization closing SqlSession [org.apache.ibatis.session.defaults.DefaultSqlSession@2db1692e]
DEBUG o.s.jdbc.datasource.DataSourceUtils - Resetting read-only flag of JDBC Connection [jdbc:postgresql://10.110.62.245/data, UserName=app_reports, PostgreSQL Native Driver]
DEBUG o.s.jdbc.datasource.DataSourceUtils - Could not reset JDBC Connection after transaction
org.postgresql.util.PSQLException: Cannot change transaction read-only property in the middle of a transaction.
 at org.postgresql.jdbc2.AbstractJdbc2Connection.setReadOnly(AbstractJdbc2Connection.java:617) ~[postgresql-9.0-801.jdbc4.jar:na]
 at org.apache.commons.dbcp.DelegatingConnection.setReadOnly(DelegatingConnection.java:377) ~[commons-dbcp-1.4.jar:1.4]
 at org.apache.commons.dbcp.PoolingDataSource$PoolGuardConnectionWrapper.setReadOnly(PoolingDataSource.java:338) ~[commons-dbcp-1.4.jar:1.4]
I will update this post with the pertinent configs/code but simply, I am using a VERY basic code example and ALSO there are numerous hits on google with the exact same issue. I highly suspect it is isolated to GreenPlum but may also be isolated to GreenPlum+DBCP. The problem is, none of the web posts have a solution... if you do, please comment on my post! :) Thanks

Saturday, January 9, 2010

Multiple MySQL on Vista

Even though I don't have it fully working yet, here are the steps that I have taken:
  • Copy the installed data directory (with a new name obviously)
  • Copy the installed my.ini to new.ini and edit accordingly (see notes below)
  • Copy the installed innodb directory (with a new name obviously)
  • Install a new service to start the new instance (this was trickier than I thought but see notes below)
Edits to my.ini

Install a New Service via Command Line
There were two things that I came across:
  • When running the console, you must 'Run as Administrator' which is accessible if you right-click the shortcut for the console.
  • The syntax for adding the mysql executable with the correct options was tricky.  Basically, you must escape the double-quotes with a backslash as in the following example.  
  • Note that apparently the caret ^ is an escape character for most other command line characters.
  • Note also that the space after binPath= is apparently required.
sc create "MySQL whatever" binPath= "\"c:\yourpath\mysql\bin\mysqld-nt\" --defaults-file=\"c:\yourpath\mysql\new.ini\" MySQL"

Wednesday, August 19, 2009

LightUML

Recently, I installed the LightUML plug-in for Eclipse. The installation "process" was easy and straightforward but when I tried to create class diagrams I encountered error dialogs from Eclipse. So, after a little web research, it basically required a couple of "configuration" particulars. Some of my notes are below, but basically I decided to tell LightUML to use the UMLGraph.jar from version 4.8 (instead of the 5.2 that I had installed). As far as I know (when I wrote this), doing so did not "mess up" my UMLGraph 5.2 installation; the configuration change(s) are isolated to the LightUML plug-in.

Here are my notes:
My LightUML Install Notes : This worked for me
==============================================

=====Environment=============
Windows
Eclipse v3.4.1
GraphViz v
UMLGraph v4.8/v5.2 (see notes below)

=====Eclipse Plugin Settings==============
Preferences > Java > LightUML
* Graph file name: graph
* Output directory (...optional): src/main/lightuml
* Use package or project name as the graph file name: true
* Recurse into subpackages: true
* Javadoc executable path (optional): C:\Program Files\Java\jdk1.5.0_16\bin\javadoc.exe

Preferences > Java > LightUML > Class Diagrams > General
* attributes
* constructors
* operations
* UMLGraph extra command line parameters (optional): -outputencoding UTF-8

Preferences > Java > LightUML > Dot and Pic2plot
* Extra lookup path (optional): C:\develop\tools\graphviz\v2.24\bin
* Graphics format: png


Preferences > Java > LightUML > UML Graph
* UmlGraph.jar path: C:\develop\tools\umlgraph\UMLGraph-4.8\lib\UmlGraph.jar
* sequence.pic path: (empty) [but probably needs to be something if I try to use sequence diagrams]
* UMLGraph version 4.4+

=====Eclipse Plugin modifications============ (path...)/workspace/.metadata/.plugins/org.lightuml.core/ Change 1 : < file: build.xml > Description: For some reason, the ant script thinks that graphviz is failing even though it is just spitting out warnings about fonts. I commented out the <fail> tag in the Ant script and it allowed it to proceed. That is probably a workaround for telling Ant how to properly recognize/ignore the warnings.
<target name="dot-to-graphics">
<!-- load setting for this run (the dot-file-name) -->
<property file="runsettings.ini" />

<property environment="env"/>
<exec
executable="dot"
searchpath="true"
errorproperty="dot.error">

<env key="PATH" path="${extra-lookup-path}:${env.PATH}"/>
<arg line="${dot-extra-param}"/>
<arg value="-T${graphics-format}"/>
<arg value="-ograph/${dot-file-name}.${graphics-format}"/>
<arg value="graph/${dot-file-name}.dot"/>
</exec>
<!-- remove the dot file -->
<delete file="graph/${dot-file-name}.dot" />

<!-- =================================
<fail message="Error executing Graphviz 'dot' ::: ${dot.error}">
<condition>
<length string="${dot.error}" when="greater" length="0"/>
</condition>
</fail>
================================= -->
</target>

Change 2: Description: As found on a sourceforge bug report, make all occurrances of 'useexternalfile' look like the following snippet; *At this time, I honestly do not know what this does.
useexternalfile="no"

Monday, July 13, 2009

Where are my iBatis log messages?

I had setup my webapps and Tomcat to use log4j according to their very own documentation [insert-link-here] but my webapps were not logging iBatis log messages nor the java.sql messages that it uses.

Short story first:
Because of what must obviously be classloader issues(as discussed ad nauseum on the web), I moved the following files from ...tomcat/common/lib to .../tomcat/server/lib:
  • commons-logging-1.1.1.jar
  • log4j-1.2.8.jar
Now, everything seems to work fine yet I only found ONE(1) web site which gave this advice (and it was not directly related to missing log entries). Hope it helps someone else since I spent quite a bit of time perusing the web.

Any feedback is welcome (of a constructive sort), but here are the key points I will take away from this lesson:
  • I think I would recommend this for any web application setup that uses JCL (either directly or through a dependent JAR).
  • Tomcat logging is working correctly via a log4j.properties file in .../tomcat/server/classes, and all webapps seem to be logging correctly as configured in their web-inf/classes/log4j.xml file

Tuesday, June 2, 2009

Prevent browser cache of JSP pages using Struts

I am sure this is addressed in a million places on the net but this is my blog, so there. Simply set the 'nocache' property to 'true' on the 'controller' in struts-config.xml (I am using Struts 1/classic).

[todo: add the example XML and the example HTTP Response before/after]

Wednesday, May 27, 2009

JFreeChart and Time-based Bar Charts

Ok... I do not get many comments on my posts (because they are short and boring) but am really looking for people to comment on this one because I am looking for feedback.

I have used CeWolf/JFreeChart for about two years now (off and on). If someone asked me to rank my knowledge of them (1 to 10) I would answer 5 - not an expert, not a novice. Recently, it has become common for my users to want time-based charts. It seems that JFreeChart does not provide much utility for building bar charts based on time series. Am I seeing this correctly? or am I failing to understand a fundamental concept of JFreeChart? (or... other?)

Any feedback?

Tuesday, May 5, 2009

Modify Windows Services Configuration

This is mainly for my reference, but I wanted to modify the description associated with some Services in my installation of Windows. I found the following website the most helpful... I am sure there are more:
http://www.opssys.com/instantkb/article.aspx?id=10576&cNode=7G3A2L

I used the following two lines to do what I wanted:
sc query state= all | findstr "DISPLAY_NAME STATE" >svc.txt
sc description {service_name} "description_goes_here"

Force Displaytag Export to Text

When I was using displaytag to export to excel, one of my columns contained text which was being recognized as numeric (scientific notation). When googling for a possible solution, seems like a LOT of people have had this problem in various ways (displaytag or otherwise). Thanks to this webpage, my solution was to write the following column decorator:


Custom Decorator

<jsp:scriptlet>
request.setAttribute("yourdecorator", new DisplaytagColumnDecorator() {
public Object decorate(Object o, PageContext pageContext, MediaTypeEnum media) {
String decorated = (String)o;
if (media.equals(MediaTypeEnum.EXCEL) || media.equals(MediaTypeEnum.CSV)) {
decorated= "=\"" + packet + "\"";
}

return decorated
}
}
);
</jsp:scriptlet>

<display:column title="your-title" media="xml excel csv" property="your-property" decorator="yourdecorator" />


I have not run into any issues with this approach yet. If you do, I would appreciate a comment back. Thanks again to the guy who posted the hint that I reference previously.

p.s. Someone also suggested that I prepend the text with a unicode non-breaking space (see code following). Visually, it has the desired effect but it also modifies the text in the field so I do not like the solution as well. I just offer that solution to those who might want to use it.


Custom Decorator

...
decorated= "\u00a0" + packet;

Tuesday, April 14, 2009

Crystal Reports IllegalStateException

So, my companies web app was throwing this nebulous IllegalStateException exception (see stacktrace below) that did not seem to adversely affect the application but I just couldn't let it go. I was able to resolve it like this:
  1. First, I googled it... not much help in the first few pages other than telling me what I already knew. 'out' was being called after it had been commited/closed.
  2. Though I usually don't have to do this anymore, it finally dawned on me to look at the compiled JSP code. (This was legacy, pure JSP... no struts nor nothing.) We were using Tomcat 5.5 and Eclipse 3.3+ so my JSP class was in the 'work' directory of my Eclipse project. Sure enough, there were out.print("") in my compiled JSP class. Where were they coming from?
  3. We had no explicit out.print() in our JSP code, so just looking at where they were in the class and how our JSPs were constructed, it seemed a close correspondence to an out reference for every JSP directive (like @page, etc.)
  4. So, I googled this: illegalstateexception crystal tomcat
    and came across this link http://www.forumtopics.com/busobj/viewtopic.php?t=126993&sid=2b09528912043e0fbe72e0a947dc300a which basically tells you to avoid line breaks between your JSP directives.
  5. Problem solved.


|ESD|13:28:22,363|ERROR|Servlet.service() for servlet jsp threw exception [http-12080-Processor22|org.apache.catalina.core.ContainerBase.[Catalina].[localhost].[/esd].[jsp]]
java.lang.IllegalStateException: getOutputStream() has already been called for this response
at org.apache.catalina.connector.Response.getWriter(Response.java:607)
at org.apache.catalina.connector.ResponseFacade.getWriter(ResponseFacade.java:196)
at org.apache.jasper.runtime.JspWriterImpl.initOut(JspWriterImpl.java:125)
at org.apache.jasper.runtime.JspWriterImpl.flushBuffer(JspWriterImpl.java:118)
at org.apache.jasper.runtime.PageContextImpl.release(PageContextImpl.java:179)
at org.apache.jasper.runtime.JspFactoryImpl.internalReleasePageContext(JspFactoryImpl.java:116)
at org.apache.jasper.runtime.JspFactoryImpl.releasePageContext(JspFactoryImpl.java:76)
at org.apache.jsp.pages.reports.CrystalReportViewer_jsp._jspService(CrystalReportViewer_jsp.java:184)
at org.apache.jasper.runtime.HttpJspBase.service(HttpJspBase.java:98)
at javax.servlet.http.HttpServlet.service(HttpServlet.java:803)
at org.apache.jasper.servlet.JspServletWrapper.service(JspServletWrapper.java:331)
at org.apache.jasper.servlet.JspServlet.serviceJspFile(JspServlet.java:329)
at org.apache.jasper.servlet.JspServlet.service(JspServlet.java:265)
at javax.servlet.http.HttpServlet.service(HttpServlet.java:803)
at org.apache.catalina.core.ApplicationFilterChain.internalDoFilter(ApplicationFilterChain.java:269)
at org.apache.catalina.core.ApplicationFilterChain.doFilter(ApplicationFilterChain.java:188)
at org.displaytag.filter.ResponseOverrideFilter.doFilter(ResponseOverrideFilter.java:125)
at org.apache.catalina.core.ApplicationFilterChain.internalDoFilter(ApplicationFilterChain.java:215)
at org.apache.catalina.core.ApplicationFilterChain.doFilter(ApplicationFilterChain.java:188)
at org.apache.catalina.core.StandardWrapperValve.invoke(StandardWrapperValve.java:213)
at org.apache.catalina.core.StandardContextValve.invoke(StandardContextValve.java:172)
at org.apache.catalina.core.StandardHostValve.invoke(StandardHostValve.java:127)
at org.apache.catalina.valves.ErrorReportValve.invoke(ErrorReportValve.java:117)
at org.apache.catalina.core.StandardEngineValve.invoke(StandardEngineValve.java:108)
at org.apache.catalina.connector.CoyoteAdapter.service(CoyoteAdapter.java:174)
at org.apache.coyote.http11.Http11Processor.process(Http11Processor.java:875)
at org.apache.coyote.http11.Http11BaseProtocol$Http11ConnectionHandler.processConnection(Http11BaseProtocol.java:665)
at org.apache.tomcat.util.net.PoolTcpEndpoint.processSocket(PoolTcpEndpoint.java:528)
at org.apache.tomcat.util.net.LeaderFollowerWorkerThread.runIt(LeaderFollowerWorkerThread.java:81)
at org.apache.tomcat.util.threads.ThreadPool$ControlRunnable.run(ThreadPool.java:689)
at java.lang.Thread.run(Thread.java:595)

Wednesday, April 8, 2009

Script your ODBC Data Sources (MySQL)

Ok... admittedly this has to do with Windows scripting and not Java nor Javascript but is something that affects many of my projects. If your computer needs ODBC Data Sources, you can script their creation (particularly useful for configuring new developers' computers).

This script should provide a fairly useful start to customizing your own version. I am going to assume that it is fairly self-explanatory but you can always post a response if you do not agree or have a question.


'================================================================
' This script creates one or more ODBC Data Sources.

' Usage: >cscript crystal.odbc.test.vbs
'
' Notes:
' * Search for 'configure-here' for all customization options
'================================================================
Const HKEY_LOCAL_MACHINE = &H80000002

strPrefix = "winmgmts:{impersonationLevel=impersonate}!\\"
strComputer = "."
strSuffix = "\root\default:StdRegProv"
strObjRef = strPrefix & strComputer & strSuffix ': wscript.echo strObjRef
Set objReg = GetObject(strObjRef) 'The Set keyword is mandatory

DriverNames = Array("SQL Server", "MySQL ODBC 3.51 Driver") 'Generally, do not modify these
Drivers = Array("C:\WINDOWS\System32\SQLSRV32.dll", "C:\WINDOWS\system32\myodbc3.dll") 'Generally, do not modify these
'================================================================
' Configuration Section
'================================================================
Const Chosen = 1 'configure-here: Zero-based index into the following two arrays; i.e. which DB are you using
Const Server = "xxxwebtest" 'configure-here: the machine where the DB is hosted
Const Port = "3307" 'configure-here: the port where the DB is hosted
Const Uid = "root" 'configure-here: the username to the DB
Const Pwd = "admin" 'configure-here: the password to the DB
ConnectionList = Array("dbone", "dbtwo", "etcetera") 'configure-here: see Note 1 below

REM *** Note 1 *** This is the array of ODBC Names which you will be creating;
REM also is the name of the database which the odbc connects to
'=== End : Configuration Section ================================

for each connection in ConnectionList
wscript.echo "*** Start *** Creating ODBC Data Source: " & connection

' *** Step 1 *** Create new Data Source Entry in system folder ...\ODBC Data Sources
strKeyPath = "SOFTWARE\ODBC\ODBC.INI\ODBC Data Sources"
strValueName = connection
strValue = DriverNames(Chosen)
call WriteToRegistry

' *** Step 2 *** Create Data Source configuration in new user-defined folder {connection}
strKeyPath = "SOFTWARE\ODBC\ODBC.INI\" & connection
objReg.CreateKey HKEY_LOCAL_MACHINE,strKeyPath

' *** Step 2a *** Database
strValueName = "DATABASE"
strValue = connection
call WriteToRegistry

' *** Step 2b *** Driver
strValueName = "DRIVER"
strValue = Drivers(Chosen)
call WriteToRegistry

' *** Step 2c *** Server
strValueName = "SERVER"
strValue = Server
call WriteToRegistry

' *** Step 2d *** Port
strValueName = "PORT"
strValue = Port
call WriteToRegistry

' *** Step 2e *** UID
strValueName = "UID"
strValue = Uid
call WriteToRegistry

' *** Step 2f *** PWD
strValueName = "PWD"
strValue = Pwd
call WriteToRegistry

' *** Step 2g *** Trusted_Connection : SQL Server only?
strValueName = "Trusted_Connection"
strValue = "Yes"
' call WriteToRegistry

' *** Step 2h *** Description
strValueName = "DESCRIPTION"
strValue = "EditMeThroughRegEdit"
call WriteToRegistry

wscript.echo "*** Finished *** Creating ODBC Data Source.\n"
next 'connection
'===== End of Script =====

'================================================================
' Subroutines and Functions
'================================================================
Sub WriteToRegistry
Const debugDesired = false
If debugDesired Then
wscript.echo "Simulating name/value to: HKEY_LOCAL_MACHINE\" & strKeyPath & ": " & strValueName & "/" & strValue
Else
wscript.echo "Modifying name/value to: HKEY_LOCAL_MACHINE\" & strKeyPath & ": " & strValueName & "/" & strValue
objReg.SetStringValue HKEY_LOCAL_MACHINE,strKeyPath,strValueName,strValue
End If
End Sub

Tuesday, March 24, 2009

iBATIS Parameter Maps (a.k.a my iBATIS brain f*rt)

Problem:
On a project using iBATIS, I was receiving the following stacktrace:

stacktrace
org.springframework.dao.TransientDataAccessResourceException: SqlMapClient operation; SQL [];  
--- The error occurred in {myproject}/PlanningProject.xml. 
--- The error occurred while applying a parameter map. 
--- Check the {myparametermap}  
--- Check the parameter mapping for the 'startDate' property.  

--- Cause: java.sql.SQLException: Parameter index out of range (1 > number of parameters, which is 0).; nested exception is com.ibatis.common.jdbc.exception.NestedSQLException:   
--- The error occurred in com/kpe/resourcePlanning/domain/dao/ibatis/PlanningProject.xml. 
--- The error occurred while applying a parameter map. 
--- Check the {myparametermap}  
--- Check the parameter mapping for the 'startDate' property.  
--- Cause: java.sql.SQLException: Parameter index out of range (1 > number of parameters, which is 0).


And this is the snippet of the parameter map that is significant:

PlanningProject.xml
  <parameterMap id="updatePmap" class="PlanningProject">
    <parameter property="startDate" jdbcType="TIMESTAMP" javaType="org.joda.time.LocalDate" typeHandler="com.kpe.resourcePlanning.domain.dao.ibatis.TypeHandlerCallbackLocalDate" />
    <parameter property="endDateConstraint" jdbcType="TIMESTAMP" javaType="org.joda.time.LocalDate" typeHandler="com.kpe.resourcePlanning.domain.dao.ibatis.TypeHandlerCallbackLocalDate" />     
    <parameter property="modifiedBy" jdbcType="VARCHAR" />
    <parameter property="id" jdbcType="NUMBER" />
  </parameterMap>

  <update id="update" parameterMap="updatePmap">
    UPDATE resourcePlanning.planningproject
    SET 
        startDate = #startDate#,
        endDateConstraint = #endDateConstraint#,
        modifiedBy = #modifiedBy#,
        modifiedDate = now() 
    WHERE 
        projectId = #id#
  </update>


Well, my project hardly ever used explicit parameter maps. Usually, statements used the parameterClass="" syntax. So, as you might already know, my syntax was terribly wrong. The correct syntax follows. The thing to note (at least for me) is that the order of the individual SET parameters must match the order given in the parameter map that you use.


  <parameterMap id="updatePmap" class="PlanningProject">
    <parameter property="startDate" jdbcType="TIMESTAMP" javaType="org.joda.time.LocalDate" typeHandler="com.kpe.resourcePlanning.domain.dao.ibatis.TypeHandlerCallbackLocalDate" />
    <parameter property="endDateConstraint" jdbcType="TIMESTAMP" javaType="org.joda.time.LocalDate" typeHandler="com.kpe.resourcePlanning.domain.dao.ibatis.TypeHandlerCallbackLocalDate" />     
    <parameter property="modifiedBy" jdbcType="VARCHAR" />
    <parameter property="id" jdbcType="NUMBER" />
  </parameterMap>

  <update id="update" parameterMap="updatePmap">
    UPDATE resourcePlanning.planningproject
    SET 
        startDate = ?,
        endDateConstraint = ?,
        modifiedBy = ?,
        modifiedDate = now() 
    WHERE 
        projectId = ?
  </update>

Monday, March 23, 2009

Animate Your Page During Confirmation

Problem:
I desired the following feature on my page. When the user clicked a link, do the following:
  1. Use scriptaculous animations to "get rid of" the current page (goal is to eliminate other links and form submit buttons and provide visual feedback that a 'process' has started).
  2. Display the dialog that was *already* coded into the link's onclick event.
  3. If they choose 'ok', give them visual feedback that the action has been submitted and then *continue* to the link destination.
  4. If they choose 'cancel', restore the page.

Solution: yourpage.jsp
Event.observe( window, 'load',
  function() {
      //alert('observing window load');

      $$('.processRole').each(

          function(value, index) {
              var old = value.onclick;

              value.onclick = function() {

                  new Effect.SlideUp('pagecontent', {
                      duration: 1.0,
                      queue: 'front'
                  });

                  new Effect.Fade('copyRight', {
                      duration: 1.0,
                      queue: 'end',
                      afterFinish: function(o) {
                          var rv = old.call(value);

                          if (rv) {
                              // alert('you chose ok');

                              new Effect.Appear('waitNotification', {
                                  queue: 'end'
                              });

                              new Effect.Highlight('waitNotification', {
                                  queue: 'end'
                              });
                           
                              new Effect.Appear('copyRight', {
                                  queue: 'end'
                              });                              

                              location.href = value;

                          } else {
                              //alert('you chose cancel');

                              new Effect.SlideDown('pagecontent', {
                                  duration: 1.0,
                                  queue: 'front'
                              });
                            
                              return false; // this return doesn't have any effects currently
                          };

                      }

                  });
                            
                  return false; // always return false
              };

          }
      );      
  }

);


A slight improvement; do not begin the navigation until the last animation is finished:
snippet: yourpage.jsp
                         
new Effect.Appear('copyRight', { 
    queue: 'end',
    afterFinish: function(o) {
     location.href = value;
    }
});

//location.href = value;

Tuesday, March 17, 2009

iBATIS Datasource Configuration (plus Spring)

On a project, we originally used iBATIS "raw" and had the prototypical datasource defined like this:


sqlMap.xml
    <transactionManager type="JDBC">     
<dataSource type="SIMPLE">
<property name="JDBC.Driver" value="${ibatis.mysql.driver}"/>
<property name="JDBC.ConnectionURL" value="${ibatis.mysql.url}/resourcePlanning" /> jdbc:mysql://localhost:3306/powerSource" />
<property name="JDBC.Username" value="${ibatis.mysql.user}"/>
<property name="JDBC.Password" value="${ibatis.mysql.password}"/>

<property name="Pool.PingQuery" value="select 1"/>
<property name="Pool.PingEnabled" value="true"/>
<property name="Pool.PingConnectionsOlderThan" value="${ibatis.timeout}"/>

</dataSource>
</transactionManager>

Upon improving our application architecture to use true DAOs, we concurrently upgraded to use Spring DI in our web app and subsequently took advantage of using Spring 'template' wrappers. However, changing the configuration was quite a lesson learned on my part:

Step 1: Remove transactionManager from iBATIS

Step 2: Create new 'datasource' bean using Spring
spring.xml
    <bean id="dataSource" class="org.apache.tomcat.dbcp.dbcp.BasicDataSource">
<property name="url" value="${ibatis.mysql.url}/resourcePlanning"/>
<property name="username" value="${ibatis.mysql.user}"/>
<property name="password" value="${ibatis.mysql.password}"/>
<property name="driverClassName" value="${ibatis.mysql.driver}"/>


<property name="testWhileIdle" value="true"/>
<property name="validationQuery" value="select 1"/>

<property name="logAbandoned" value="true"/>
<property name="removeAbandoned" value="true"/>
<property name="removeAbandonedTimeout" value="3600"/>

<property name="maxWait" value="20"/>
<property name="maxIdle" value="10"/>
<property name="maxActive" value="-1"/>

</bean>


Step 3: Create new Spring-wrapped SqlMapClient using new 'datasource' bean

spring.xml
    <bean id="sqlMapClient" class="org.springframework.orm.ibatis.SqlMapClientFactoryBean">
<property name="configLocation">
<value>classpath:com/kpe/resourcePlanning/domain/dao/ibatis/sqlMap.xml</value>
</property>

<property name="transactionConfigClass">
<value>com.ibatis.sqlmap.engine.transaction.jdbc.JdbcTransactionConfig</value>
</property>

<property name="dataSource">
<ref bean="dataSource"/>
</property>

</bean>

VisualVM on Windows with SDKMAN

 7/31/2024 - I have been using SDKMAN on Windows via Git Bash for some time now and truly like it.  I did however come across an interesting...